What is “Ask a Question”?
Audible is quietly beta-testing “Ask a Question,” or as I can’t resist calling it, Q&Ai. This AI-driven helper answers your questions about plot points, character motivations, historical context, literary devices, and more. Tap the new Ask a Question button while the audiobook is playing and type or ask your question out loud. Answers appear instantly, so you never need to pause and search the web or rewind a chapter.
First look at the landing screen
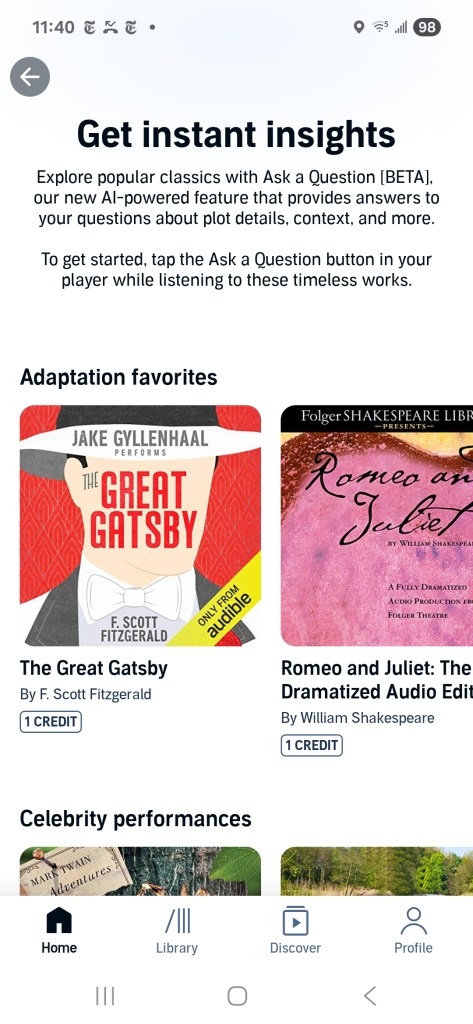
The screen is titled Get instant insights and invites listeners to:
Explore popular classics with Ask a Question [BETA] … Tap the button in your player while listening to these timeless works.
Two curated rows are highlighted:
Adaptation favourites
The Great Gatsby (performed by Jake Gyllenhaal) and Romeo and Juliet: The Folger dramatised audio edition are each available for one credit.
Celebrity performances
Dracula (performed by Alan Cumming and Tim Curry), Little Women (performed by Laura Dern), and Les Misérables (translated by Julie Rose) are offered as a mix of titles included with membership and options that cost one credit.
Additional classics populate the carousel—Tom Sawyer, Huckleberry Finn, The Odyssey, The Iliad, Meditations, A Book of Five Rings, The Count of Monte Cristo, Northanger Abbey, and selections from Dickens and Beatrix Potter. Modern best sellers are absent; for now the beta is limited to public-domain or long-established works, likely to minimize spoiler risks and copyright complexity.
How it works in practice
- Start any supported audiobook from the curated list.
- Tap “Ask a Question” in the player.
- Type or dictate your query. Examples:
- Why does Gatsby call Nick “old sport”?
- What historical events framed Victor Hugo’s writing of Les Misérables?
- Read the reply without leaving the app. The answer stays onscreen while playback continues.
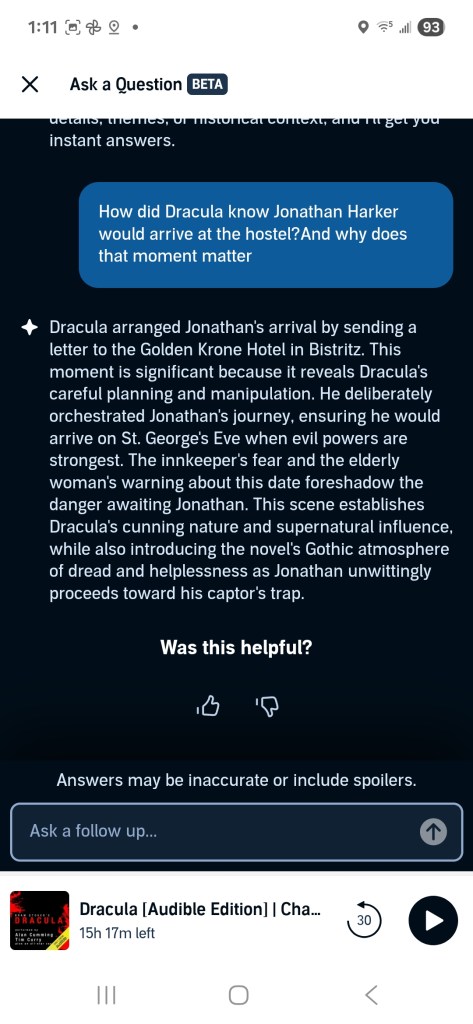
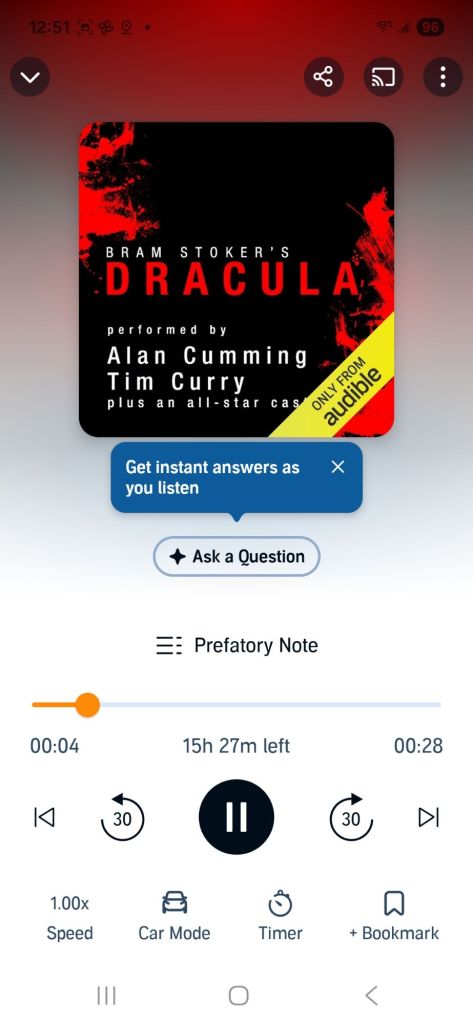
I tested it with Dracula by asking, “How did Dracula know Jonathan Harker would arrive at the hostel, and why does that moment matter?”
The AI answered in about 1 second: “Dracula arranged Jonathan’s arrival by sending a letter to the Golden Krone Hotel in Bistritz. This moment is significant because it reveals Dracula’s careful planning and manipulation. He deliberately orchestrated Jonathan’s journey, ensuring he would arrive on St. George’s Eve when evil powers are strongest. The innkeeper’s fear and the elderly woman’s warning about this date foreshadow the danger awaiting Jonathan. This scene establishes Dracula’s cunning nature and supernatural influence, while also introducing the novel’s Gothic atmosphere of dread and helplessness as Jonathan unwittingly proceeds toward his captor’s trap.” A thumbs-up or thumbs-down prompt followed, along with a caution that answers may be inaccurate or include spoilers.
Early impressions
Strengths
- Clarity: answers are short, sourced, and spoiler-aware.
- Convenience: no switching to a browser means fewer distractions.
- Performance: latency is negligible; faster than Dracula turning into mist.
Limitations
- Catalog scope: only classics so far.
- Depth: nuanced literary analysis sometimes feels surface-level.
- Citations: the beta lists chapter numbers, not full references.
Overall, it already beats pausing to search Stack Exchange or Wikipedia. If Audible widens the catalog and deepens the commentary, it could become a staple for students and casual readers alike.
What I hope to see next
- Contemporary titles with author-approved Q&A scopes
- Richer sourcing (edition, translator, narrator) for academic citation
- Context-aware follow-ups so the AI remembers the thread of questions
- Accessibility support for visually impaired users who rely on voice input
Try it yourself
The beta is rolling out gradually in the latest Audible app (iOS and Android, July 2025 build). Look for the banner on the home screen, download one of the featured classics, and pose a question mid-chapter. Share your results—I will gather feedback and post a follow-up review next week.
AI assistance acknowledgement
This post was drafted by the author, refined with generative-AI suggestions, and finalised after human review and editing.