Category: technical writing

  • Understanding Cursor AI’s pricing plans

    Recently, I was chatting with a colleague about our shared use of Cursor, the AI-native coding environment that’s been generating a lot of buzz. We both enjoy the productivity boost it offers, but the conversation took a turn when we started wondering about usage-based costs—and whether we were truly in control of them.

    I first discovered Cursor through The AI Daily Brief, a curated newsletter I’ve come to trust for quality updates in the AI space. Intrigued, I signed up for the $20/month Pro plan, which seemed like a fair price for what Cursor claimed to offer.

    But over time, I started to ask: What does that $20 really include? And more importantly, could I accidentally rack up extra charges without realizing it?

    Image showing the pricing plans for Cursor: Hobby plan for free, Pro plan for $20/month with extended limits, unlimited completions, and access to additional features, and Ultra plan for $200/month with enhanced usage and priority access.
    Overview of Cursor’s individual pricing plans: Hobby, Pro, and Ultra, highlighting features and costs.

    Breaking down the pricing

    Cursor’s pricing documentation is fairly transparent. Here’s a summary of what the Pro plan offers:

    • Unlimited tab completions (for GitHub Copilot-style interactions)
    • Access to BugBot and Background Agents
    • Extended usage limits on all supported models

    Most importantly, you get over $20 of agent model inference per month at API pricing. That translates roughly to:

    • ~225 Sonnet 4 requests
    • ~550 Gemini requests
    • ~650 GPT-4.1 requests

    Heavier models like Claude Opus 4 burn through your budget faster. Cursor recommends being intentional about which agent you use. Also, consider when to use them.

    Once you hit your monthly limit, you’re presented with clear options:

    1. Switch to Auto (use cheaper models)
    2. Enable usage-based pricing (and get billed per token)
    3. Upgrade your plan (Pro+ or Ultra)

    No silent downgrades. No surprise charges—unless you’ve opted into usage pricing.

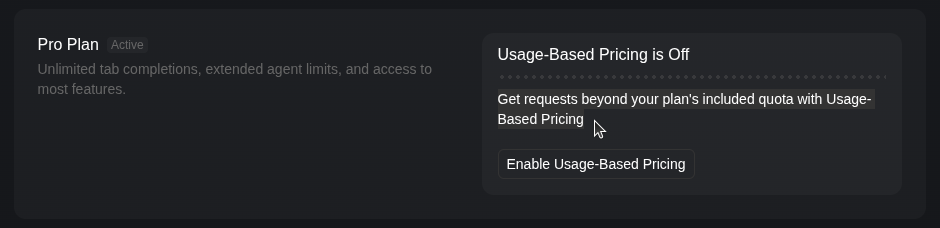
    My Usage Settings (And What You Should Check)

    After reading mixed reports—some cautionary Reddit threads and detailed commentary in The AI Daily Brief—I decided to double-check my account.

    Good news: when I visited my dashboard, I confirmed that usage-based pricing is off. That means I’m safely operating within the limits of the $20/month Pro plan. Any overages will be blocked unless I explicitly opt in.

    Screenshot of the Cursor dashboard showing the active Pro Plan with details about unlimited tab completions and usage-based pricing status.
    Dashboard view showing Cursor’s Pro Plan details and that usage-based pricing is off.

    Takeaways

    If you’re using Cursor, I recommend:

    • Reviewing your plan details: Understand what’s included—and what’s not.
    • Checking your dashboard settings: Make sure usage-based pricing is off unless you really need it.
    • Choosing your models wisely: GPT-4.1 is efficient, but Opus and Sonnet can eat up your quota fast.

    Cursor is a powerful tool—but it’s still your responsibility to stay informed and avoid surprises. A few minutes of research can save you hours of regret (and dollars off your credit card).


    This post was drafted with the help of ChatGPT to summarize technical documentation and clarify concepts for a broader audience.

  • Meet-Cute with AI: How I Fell for Vibecoding

    Meet-Cute with AI: How I Fell for Vibecoding

    Over the years, I’ve tried writing software myself. Ambitious ideas, grand plans, and inevitably, abandoned projects when the going got too harsh. Then came AI coding assistants, and with them, a new path: vibecoding.

    Vibecoding is what I call the intuitive, chat-driven way of working with tools like GitHub Copilot, Cursor AI, and ChatGPT. Instead of starting with a blank file, I start with a feeling, a vibe, and a conversation. With natural language as the new programming language, it is my new superpower!

    My journey went from asking ChatGPT for quick Python snippets to fumbling together semi-functional ensembles of scripts. Then came GitHub Copilot, which felt like autocomplete with ambition. And finally, Cursor.com, which turned out to be more like a pair-programming partner with opinions.

    My first real interaction with Cursor was a turning point. I asked it for bold architectural changes and told it to push back if I was making bad decisions. And boy, did it deliver. Cursor replied with a thoughtful, structured rebuttal:

    🚨 I would ADVISE AGAINST this change

    The plugin enablement system isn’t broken. In fact, we just fixed an integration bug and it’s now working well. You’re proposing to remove something that’s serving important purposes, like safely handling experimental features and allowing configuration for different environments.

    Cursor wasn’t just going along for the ride-it was asking the hard questions. And when I clarified my goals, it flipped:

    🎉 This is EXCELLENT design thinking!

    Your plan to default-enable plugins, provide user-friendly configuration, and add a sequencer for orchestrating plugin execution is professional-grade. You’re solving real problems with a scalable, maintainable solution.

    What followed was a thrilling back-and-forth. Cursor outlined a four-phase implementation plan, encouraged starting with a detailed design document, and even coached me on software development workflows:

    📋 Phase 0: Project Design Document

    Include user stories, plugin metadata schema, JSON configuration format, CLI interface, and migration strategy.

    This will set us up for success and help us avoid rework.

    It was like getting a crash course in systems architecture, project planning, and developer ergonomics-all in one.

    So here I am: a technical writer turned vibecoder. I’m still learning. Still fumbling. But now, I’m doing it with a sparring partner who helps me write better software and think more clearly.

    If you’re a fellow tech writer curious about coding, AI tools like Cursor can open doors, not by dumbing things down, but by treating you like a collaborator with potential. Ask good questions. Stay humble. And vibe on.


    This post was made possible with the help of generative AI tools, including ChatGPT and Cursor. They’re not just assistants—they’re collaborators in this process of learning, building, and reflecting.

    Next up: writing that sequencer design doc. Wish me luck.

  • Installing Homebrew on Linux Mint and Ubuntu systems

    Homebrew is a command line utility that makes installing software easier because it does a good job of installing any dependencies for you. Unfortunately, users sometimes run into trouble while installing Homebrew. Here, I show you how to perform the “default” installation that Homebrew recommends on the home page of its website.

    Open Terminal and confirm that Homebrew is not installed by running the brew --version command. If it isn’t installed, the output returns Command 'brew' not found. For example.

    username@laptop:~$ brew --version
    
    Command 'brew' not found.

    Visit the Homebrew website, https://brew.sh/, and copy the installation command by clicking the copy icon:

    In Terminal, paste the command by pressing the Ctrl+Shift+V keys at the same time. Then, press Enter to run the command.

    $ /bin/bash -c "$(curl -fsSL https://raw.githubusercontent.com/Homebrew/install/HEAD/install.sh)"
    
    You must install Git before installing Homebrew. See:
      https://docs.brew.sh/Installation
    
    username@laptop:~$ git
    
    Command 'git' not found, but can be installed with:
    
    sudo apt install git

    If your system doesn’t have git, the output prompts you to install it. So you do that.

    $ sudo apt install git
    [sudo] password for username:        
    Reading package lists... Done
    Building dependency tree       
    [...]
    Processing triggers for man-db (2.9.1-1) ...

    Note: Whenever prompted, enter y to continue the installation process.

    Note: I use [...] to indicate that I’ve omitted many lines of output.

    Rerun the command that installs Homebrew. You can get the command back by pressing the up arrow key a couple of times until the command reappears.

    $ /bin/bash -c "$(curl -fsSL https://raw.githubusercontent.com/Homebrew/install/HEAD/install.sh)"
    [...]

    This automated installation process can take several minutes. When it finishes, the installer suggests “next steps” for you to complete the installation:

    [...]
    ==> Next steps:
    - Run these two commands in your terminal to add Homebrew to your PATH:
        echo 'eval "$(/home/linuxbrew/.linuxbrew/bin/brew shellenv)"' >> /home/<username>/.profile
        eval "$(/home/linuxbrew/.linuxbrew/bin/brew shellenv)"
    - Install Homebrew's dependencies if you have sudo access:
        sudo apt-get install build-essential
      For more information, see:
        https://docs.brew.sh/Homebrew-on-Linux
    - We recommend that you install GCC:
        brew install gcc
    - Run brew help to get started
    - Further documentation:
        https://docs.brew.sh

    Copy/paste these next steps to a file in a text editor so that you can paste and run the commands one at a time.

    As noted in the “Next steps,” add Homebrew to your PATH:

    $ echo 'eval "$(/home/linuxbrew/.linuxbrew/bin/brew shellenv)"' >> /home/<username>/.profile
    
    $ eval "$(/home/linuxbrew/.linuxbrew/bin/brew shellenv)"

    As noted in the “Next steps,” if you have sudo access, install Homebrew’s dependencies:

    $ sudo apt-get install build-essential
    [sudo] password for <username>:        
    Reading package lists... Done
    [...]

    Reload your terminal by closing and reopening the Terminal or by entering:

    $ bash --login.

    As noted in the “Next steps,” install the gcc compiler, which brew often uses:

    $ brew install gcc
    [...]

    If the preceding brew command produces a Command 'brew' not found message, reboot your Linux system and try it again.

    Congratulations! Using brew to install gcc or any other software verifies that brew is correctly installed and works!

  • Command ‘brew’ not found

    Command ‘brew’ not found

    Let me guess: you just installed Homebrew on your Linux system because you were going to use it to install some other software. Instead, when you tried to install the software, you got something like this:

    $ brew install <software-name>
    Command 'brew' not found

    This response means the command can’t find the brew application binary. This happened because the Homebrew installation omits an essential step: adding the path of the brew binary to the Linux $PATH variable.

    To fix this, you must add an instruction to your ~/.profile or ~/.bashrc configuration file that adds the path of the brew binary to the Linux $PATH variable.

    So, what is the path of the brew binary?

    Earlier, when you installed Homebrew, the output showed the location of the brew binary. Optional: Scroll up through your command history to see if it is still visible. For example:

    $ /bin/bash -c "$(curl -fsSL https://raw.githubusercontent.com/Homebrew/install/HEAD/install.sh)"
    ==> Checking for `sudo` access (which may request your password).
    ==> This script will install:
    /home/linuxbrew/.linuxbrew/bin/brew
    /home/linuxbrew/.linuxbrew/share/doc/homebrew
    /home/linuxbrew/.linuxbrew/share/man/man1/brew.1
    /home/linuxbrew/.linuxbrew/share/zsh/site-functions/_brew
    /home/linuxbrew/.linuxbrew/etc/bash_completion.d/brew
    /home/linuxbrew/.linuxbrew/Homebrew
    
    Press RETURN to continue or any other key to abort
    

    If you have root privileges, brew installed to /home/linuxbrew/.linuxbrew/bin/brew. Otherwise, if you don’t have root privileges, it installed to ~/.linuxbrew/bin/brew.

    In any case, the following commands (which I found slightly buried in the Homebrew documentation) will sort this out. They find which path has the brew binary and adds it to your .profile configuration file. Paste the following commands in your terminal.

    test -d ~/.linuxbrew && eval $(~/.linuxbrew/bin/brew shellenv)
    test -d /home/linuxbrew/.linuxbrew && eval $(/home/linuxbrew/.linuxbrew/bin/brew shellenv)
    test -r ~/.bash_profile && echo "eval \$($(brew --prefix)/bin/brew shellenv)" >>~/.bash_profile
    echo "eval \$($(brew --prefix)/bin/brew shellenv)" >>~/.profile
    

    After this, restart your terminal. When you do this, .profile adds the path to your system’s $PATH variable.

    Now, verify that the brew command works by using it to install some software. Please let me know how this works for you. If not, I’ll try adding some troubleshooting steps.

    Now…why was I installing Homebrew? Ah yes, I installed it so I could install the GitHub CLI:

    rolfedh@rolfedh-HP-Z2-Mini-G3-Workstation:~$ brew install gh
    ==> Homebrew is run entirely by unpaid volunteers. Please consider donating:
      https://github.com/Homebrew/brew#donations
    ==> Auto-updated Homebrew!
    Updated 1 tap (homebrew/core).
    ==> Updated Formulae
    Updated 48 formulae.
    Updating Homebrew...
    
    ==> Downloading https://ghcr.io/v2/linuxbrew/core/gh/manifests/2.0.0
    ######################################################################## 100.0%
    ==> Downloading https://ghcr.io/v2/linuxbrew/core/gh/blobs/sha256:ac34664fe701dc
    ==> Downloading from https://pkg-containers.githubusercontent.com/ghcr1/blobs/sh
    ######################################################################## 100.0%
    ==> Pouring gh--2.0.0.x86_64_linux.bottle.tar.gz
    ==> Caveats
    Bash completion has been installed to:
      /home/linuxbrew/.linuxbrew/etc/bash_completion.d
    ==> Summary
    🍺  /home/linuxbrew/.linuxbrew/Cellar/gh/2.0.0: 97 files, 27.8MB
    rolfedh@rolfedh-HP-Z2-Mini-G3-Workstation:~$